Tuesday, November 26, 2013

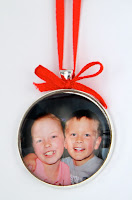
Handmade Christmas Ornaments - Photos for the tree!


Christmas Ornaments can last a life time.  So why not make some that you can look back at and go wow...How much have you grown...or ...See the braces were so worth it! Look at that smile!!! LOL


(My daughter is finally seeing that the pain of braces on her teeth, has so been worth it! Love that smile chook!)
So check out our easy instruction to help you make one or a dozen.. for your tree!

1. Open a photo in microsoft word ( Or your chosen photo edit software) and click on the format picture option. Crop the photo to the shape of your tile.  This is especially important if you are working with ovals and circles! You don't want to cut anyone's head in half!  Crop and resize the photo until you have the dimensions of the tile you are working with. (When you are working in the 'format picture' option of Word, and cropping the picture, a little box will come up on the top right and it will have the changing dimension.)

2. Change the page layout to 4 x 6 inches or 10 x 15cm borderless. Then save as a Jpeg file.

3. Print the image on a laser jet printer. I like to print mine at Officeworks. Then I can use diamond glaze directly on the photo, without any bleeding of ink.  If you are going to print on a bubble jet printer, you will need to seal the image using "Modge Podge" first.  This will stop the ink from bleeding when you apply the diamond glaze.

4. Then follow all the instructions from the previous post 

Glass tile jewellery- more than just paper! Quick, Easy, Stunning!


Glaze, Press, Cut, Glue.  Then add a nice little red ribbon if you would like the photo pendant used to decorate your tree!

We have so many other great ideas for you to try. So please join our newsletter and blog role.


AND to order any of the components needed for these projects please go to www.sunsetdesigns.com.au
So from Sunset Designs-
Merry Christmas!

Have fun crafting – Kylie :)


Crackle Nail Polish Pendants - WIth GLASS TILES!

Nail Polish Pendants are so easy to make and Stunning to wear...So lets get Cracking! ( LOL)
You will need:
Diamond glaze
Crackle nail polish
Opaque nail polish
Glass tile
Bezel setting
Chain
Adhesive.

1. Apply a layer of diamond glaze to the back of the tile and allow to dry.

2. Brush your crackle nail polish over the dried diamond glaze. Wait for this to dry. (I like a nice thick layer that will give me nice chunky cracks.)

3. Once the first layer of nail polish is dry, apply a layer of the solid colour.  This is the colour that is going to show through the glass between those cracks, so use a bright colour or something very different from your crackle colour.

3. Using Hypo Cement or E6000 glue the tile into a bezel setting.

4. Add chain and wear!

Hints:  Sometimes you can use a layer of clear nail polish instead of the diamond glaze.  However this cannot be fast dry, as it will just cause the crackle nail polish to dry and flake off the tile.  Just do some experimenting and see what works for you!


We have so many other great ideas for you to try. So please join our newsletter and blog role.

To order any of the components needed for these pieces please just go to www.sunsetdesigns.com.au

Have fun crafting – Kylie :) 


Glass tile jewellery- more than just paper! Quick, Easy, Stunning!


Glass tile Jewellery doesn't have to be, just a nice piece of japanese paper turned into a pendant!  Although this can be fantastic if this is what you like.  But did you know that there are SO many different ways that you can make fabulous jewellery? Starting with a glass tile!
So let me help you get your creative juices flowing.

First off lets start with good ol' glass tiles and paper.  This is about as easy as it gets to make GREAT LOOKING PENDANTS. Then work on variations.

1. Pick you paper.  I LOooove to use yuzen japanese papers.  These are a fabric paper, which basically means that they have a very fibrous quality to them.  If you were to try and cut them with a hand punch, you would not get the clean cut of normal paper. You get more of a torn look with straggly fibres hanging out the edges.  But don't get discouraged, these papers absorb Diamond glaze beautifully and work great with glass tiles.  You can also use scrapbooking papers, however I don't recommend card stock (to thick), or magazine pages. (More on that below).


2. Apply Diamond glass to the flat side of the glass tile.  On oval tiles this is easy to figure out.  But some square tiles look the same on both sides.  Just pick the side of the tile that is going to be the back and apply the glaze.  Remember the saying "not to much and not to little"?  Well this is same for applying glaze.  The glaze needs to be spread out over the entire tile, thinly. 

3. Now push the glaze side of the tile down onto the paper where you want the image showing through.  Push firmly.  Leave to dry.  


4. Once the glaze has dried, it is time to trim the edge of the paper.  Take a SHARP pair of scissors and cutting at an angle, trim the paper as close to the glass as you can.

 5. Seal the back of the paper with another layer of glaze.


6. Now you have three options for finishing the tile.  
     
a. Apply nail polish to the back of the piece.  Once the nail polish is dry use a strong glue like Araldite to adhere a bail.
     b. For added protection add a layer of resin to the back of the tile. While this is drying you can push in a bail.  When the resin has fully cured the bail will be secure.
     c. Using a strong glue such as Araldite, E6000 or hypo cement glue the tile into the appropriately sized bezel setting.

7. Add chain and you are done!


Note: If you would like to use magazine paper or a photo printered on a bubble jet printer you will need to use Modge Podge to seal the paper first. (Magazine paper often shows the images from the reverse side through the paper.)
However if you print your photos at Officeworks or on a Laser Jet printer, you DON’T need to seal the image.


SEE I TOLD YOU IT WAS EASY!
We have so many other great ideas for you to try. So please join our newsletter and blog role. For instructions on how to make glass tiles with nail polish or the fabulous Christmas Ornament, see the next two blog posts!
And of course to stock up on your supplies go to 

Have fun crafting – Kylie :)